 Seldon Enterprise Platform Documentation Update
REST API
Seldon Enterprise Platform API
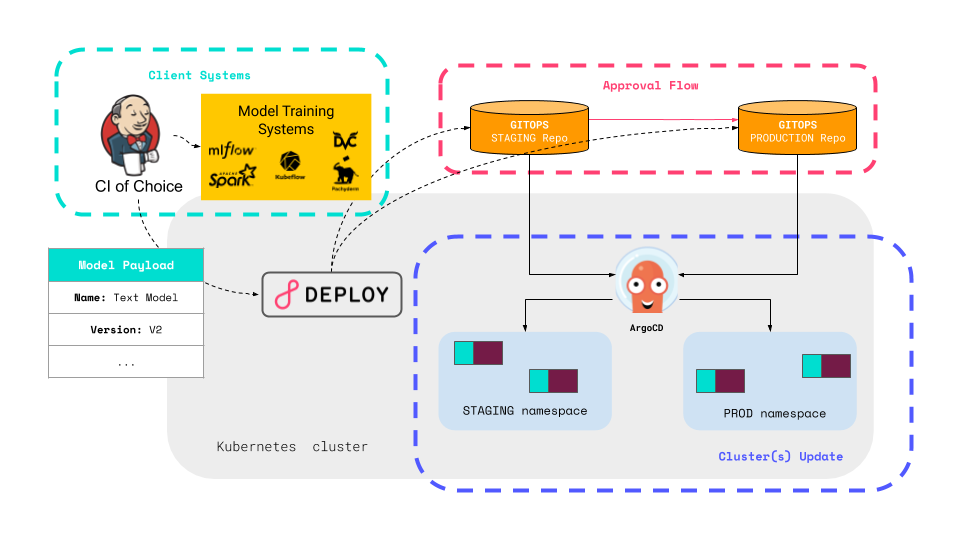
The REST API of Seldon Enterprise Platform lets you interact with your machine learning deployments programmatically. This allows you to build complex deployment pipelines to integrate Seldon Enterprise Platform with any upstream services.
If you already have access to a Seldon Enterprise Platform installation, you can visit the
interactive API reference to learn more about the Seldon Enterprise Platform API and the
endpoints that it exposes.
The interactive API documentation can be accessed by clicking on your profile
icon, and then clicking on API Docs.
Alternatively, you can go directly to
$ML_PLATFORM_HOST/seldon-deploy/swagger/, where $ML_PLATFORM_HOST needs to
be replaced by the domain where your Seldon Enterprise Platform installation can be
accessed.
Usage
The recommended way of interacting with the Seldon Enterprise Platform REST API is through
its Python SDK.
However, you can also use plain cURL to send requests.
You can find some example usages below.
Note
These usage examples assume that you have already obtained an ID token following the instructions of the Authentication section.
We can use cURL (available on most distributions) or similar HTTP clients to
interact directly with the Seldon Enterprise Platform API.
For example, if we assume that there is an authentication token present in the
$TOKEN variable, we could list our machine learning deployments as:
export ML_PLATFORM_HOST="https://ml.example.com"
curl -k -X GET \
  "$ML_PLATFORM_HOST/seldon-deploy/api/v1alpha1/namespaces/staging/seldondeployments" \
  -H "Authorization: Bearer $TOKEN"
:selected:
To use the Python SDK, the first step will be to install the
seldon-deploy-sdk package.
You can do so using pip as:
pip install seldon-deploy-sdk
Once we have obtained an authentication token, we will need to set it as the
id_token of our Configuration object.
Afterwards, we could list all our machine learning deployments under the
staging namespace as:
from seldon_deploy_sdk import Configuration, ApiClient, SeldonDeploymentsApi

config = Configuration()
config.host = "https://ml.example.com/seldon-deploy/api/v1alpha1"
config.id_token = "<AUTH_TOKEN>"

api_client = ApiClient(config)

# List current machine learning deployments
sdep_api = SeldonDeploymentsApi(api_client)
sdeps = sdep_api.list_seldon_deployments("staging")

print(sdeps)
Authentication
All requests to the Seldon Enterprise Platform API must be authenticated. Therefore, before using the API you must obtain an authentication token. Note that the process to issue a new authentication token may change depending on your architecture and your OIDC provider.
Out of the box, the Python SDK supports a set of common authentication workflows.
Each of these can be found under the seldon_deploy_sdk.auth package.
OIDCAuthenticator: Allows you to authenticate against an OIDC-compatible provider, using theauth_code,client_credentials, andpasswordflows.Flow name
Summary
SDK
auth_methodRequired parameters
Authorization code
Multi-phase process suitable for human users of SDKs
auth_codeClient ID
Client secret
Client credentials
Single-phase process suitable for automated clients in trusted environments
client_credentialsClient ID
Client secret
Password grant
Single-phase process suitable for human users of SDKs in trusted environments
password_grantUsername
User password
Client ID
(Optional) client secret
SessionAuthenticator: Allows you to authenticate against Dex, configured as an ingress-level authentication provider.
You can see some authentication examples below. Further details can be found in the Python SDK reference documentation .
OpenID Connect Providers
Seldon Enterprise Platform can use an OpenID Connect (OIDC) provider for authentication purposes,
leveraging the id_token defined by the OpenID specification.
In the below examples, we will assume the use of Keycloak as the OIDC provider,
configured with an OpenID client named sd-api under a realm named deploy-realm.
Other OIDC providers can be used, although the exact configuration options and
terminology may differ.
Full details on configuring OIDC clients in Keycloak can be found here.
CA Certificates
The following examples assume the use of HTTPS. If you are using self-signed certificates, e.g. with a trial installation of Seldon Enterprise Platform, and have not configured these on your local machine, you can still follow the examples by disabling certificate verification.
To disable certificate verification with cURL, use the -k option.
To disable certificate verification with the Python SDK,
set the verify_ssl attribute on your Configuration object to False:
# Import the Configuration class if you haven't already
from seldon_deploy_sdk import Configuration
config = Configuration()
...
# Disable certificate verification
config.verify_ssl = False
...
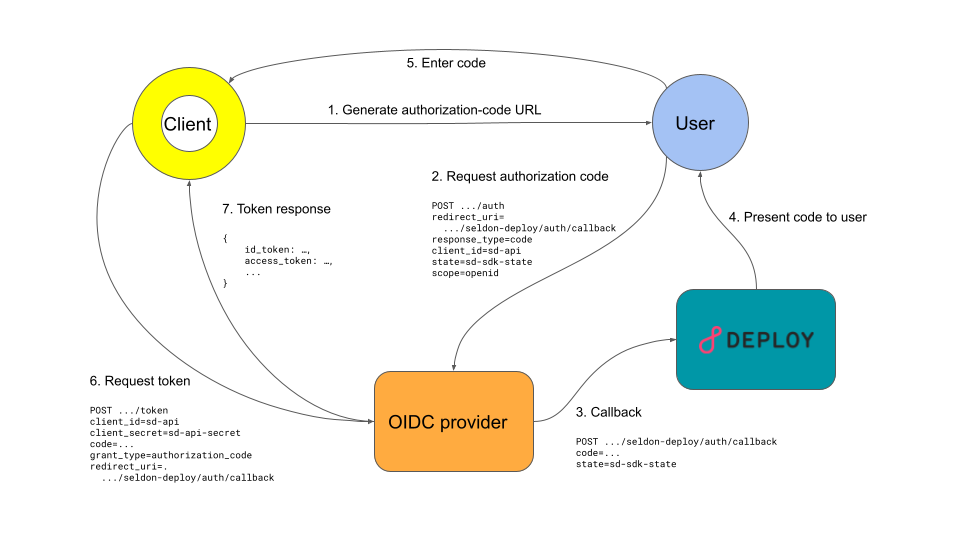
Auth Code Flow
This is the recommended OIDC flow as it is the most secure for client applications like the Python SDK. It is suitable for interactive workflows where a human user is involved.
It is a multi-stage process:
Users log in to their OIDC provider directly through a browser
After successfully logging in, the user is redirected to the service they want to access, i.e. Seldon Enterprise Platform
The user is shown a one-time access code
The user’s client exchanges this code for a long-lived token which can be used for subsequent requests
The code-token exchange can optionally use client credentials for an added layer of security.
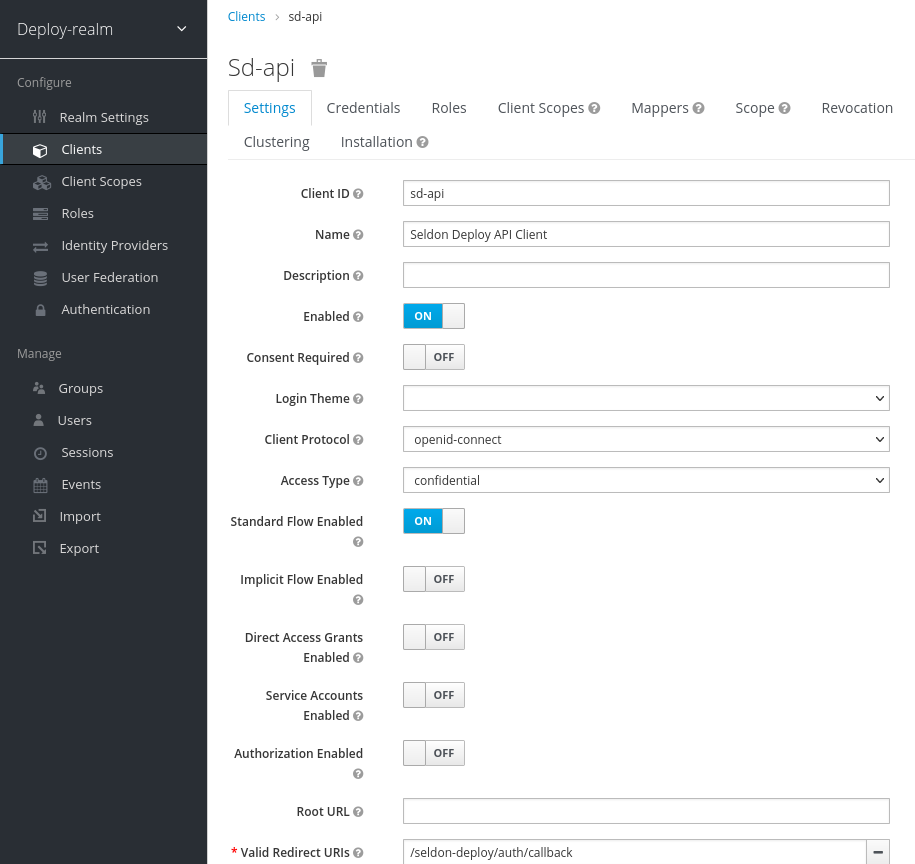
For this example, we will assume that the authorization-code flow is supported and
that the OIDC client is confidential.
In Keycloak, this can be done by setting Standard Flow Enabled, ensuring the
client’s Access Type is confidential, and checking the Valid Redirect URIs
list includes /seldon-deploy/auth/callback through the client dashboard in the
admin UI.
Client configuration - Admin UI
We can use plain cURL to obtain a token, by emulating OpenID’s
authorization code flow.
Assuming you have jq installed, use the following to generate a URL which you can copy into your browser:
export KEYCLOAK_HOST="https://ml.example.com"
export KEYCLOAK_REALM="deploy-realm"

export CALLBACK_URL="https://ml.example.com/seldon-deploy/auth/callback"

export _encoded_callback_url=$( jq -rn --arg u $CALLBACK_URL '$u | @uri' )
export _auth_code_query="response_type=code&client_id=sd-api&scope=openid&state=sd-sdk-state&redirect_uri=${_encoded_callback_url}"
export _auth_code_endpoint="${KEYCLOAK_HOST}/auth/realms/${KEYCLOAK_REALM}/protocol/openid-connect/auth"

export _auth_code_url=$( curl -s -o /dev/null -w '%{url_effective}' -G "${_auth_code_endpoint}?${_auth_code_query}" )
echo "${_auth_code_url}"
This URL will take you to a Keycloak page where you can log in.
After logging in, you will be redirected to a Seldon Enterprise Platform page displaying an authorization code. You can exchange the one-time code for a long-lived token as shown below:
export CLIENT_ID="sd-api"
export CLIENT_SECRET="sd-api-secret"

export _token_endpoint="${KEYCLOAK_HOST}/auth/realms/${KEYCLOAK_REALM}/protocol/openid-connect/token"

export RESULT=$( curl -s -X POST "${_token_endpoint}" \
  --data "grant_type=authorization_code" \
  --data "client_id=${CLIENT_ID}" \
  --data "client_secret=${CLIENT_SECRET}" \
  --data "redirect_uri=${_encoded_callback_url}" \
  --data "code=<YOUR AUTHORIZATION CODE>"
)
export TOKEN=$( echo $RESULT | sed -E 's/.*id_token":"([^"]+)".*/\1/g' )

echo "TOKEN=$TOKEN"
The Python SDK supports the authorization-code flow with auth_code
as the authentication method.
To generate an authorization request URL:
from seldon_deploy_sdk import Configuration
from seldon_deploy_sdk.auth import OIDCAuthenticator

config = Configuration()
config.auth_method = "auth_code"
config.host = "https://ml.example.com/seldon-deploy/api/v1alpha1"
config.oidc_server = "https://ml.example.com/auth/realms/deploy-realm"
config.oidc_client_id = "sd-api"
config.oidc_client_secret = "sd-api-secret"

# Authenticate against an OIDC provider
auth = OIDCAuthenticator(config)
id_token = auth.authenticate()
You will be presented with instructions and an authorization URL. Click or copy and paste the URL into your browser, where you can log in to Keycloak.
After logging in, you will be redirected to a Seldon Enterprise Platform page displaying an authorization code. You can exchange the one-time code for a long-lived token by entering the code into the Python prompt. Save the token for later use with:
# Configure the obtained ID token as the one to use downstream
config.id_token = id_token
print(config.id_token)
Client Credentials Flow
This should only be used in trusted environments as there is no user authentication involved. It may be suitable for automated pipelines such as for CI workflows.
This is a simple request-response flow:
The client sends a request to its OIDC provider with its client ID and a secret known only to it and the identity provider
The OIDC provider responds with a long-lived token that can be used for future requests

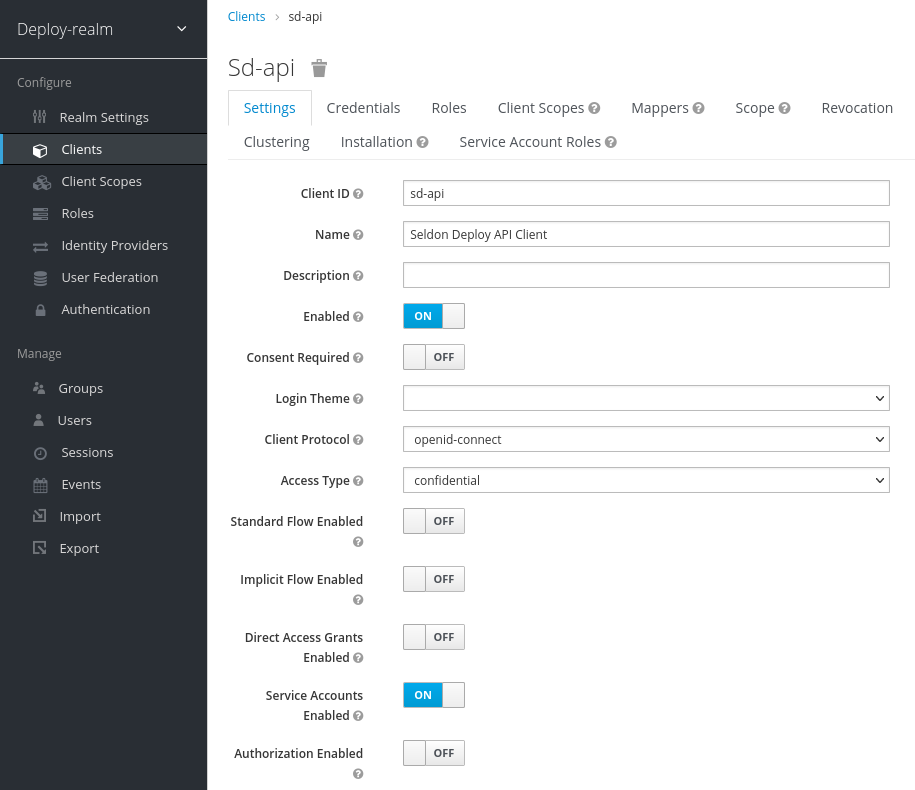
For this example, we will assume that the client credentials flow is supported and
that the OIDC client is confidential.
In Keycloak, this can be done by setting Service Accounts Enabled and ensuring the
client’s Access Type is confidential through the client dashboard in the
admin UI.
Client configuration - Admin UI
We can use plain cURL to obtain a token, by emulating OpenID’s
client credentials flow.
export CLIENT_ID="sd-api"
export CLIENT_SECRET="sd-api-secret"

export KEYCLOAK_HOST="https://ml.example.com"
export KEYCLOAK_REALM="deploy-realm"

export _token_endpoint="${KEYCLOAK_HOST}/auth/realms/${KEYCLOAK_REALM}/protocol/openid-connect/token"

export RESULT=$( curl -s -X POST --data "$_payload" "${_token_endpoint}" \
  --data "grant_type=client_credentials" \
  --data "scope=openid" \
  --data "client_id=${CLIENT_ID}" \
  --data "client_secret=${CLIENT_SECRET}"
)
export TOKEN=$( echo $RESULT | sed -E 's/.*id_token":"([^"]+)".*/\1/g' )

echo "TOKEN=$TOKEN"
The Python SDK supports the client-credentials flow with client_credentials
as the authentication method.
from seldon_deploy_sdk import Configuration
from seldon_deploy_sdk.auth import OIDCAuthenticator

config = Configuration()
config.auth_method = "client_credentials"
config.host = "https://ml.example.com/seldon-deploy/api/v1alpha1"
config.oidc_server = "https://ml.example.com/auth/realms/deploy-realm"
config.oidc_client_id = "sd-api"
config.oidc_client_secret = "sd-api-secret"

# Authenticate against an OIDC provider
auth = OIDCAuthenticator(config)
id_token = auth.authenticate()

# Configure the obtained ID token as the one to use downstream
config.id_token = id_token
print(config.id_token)
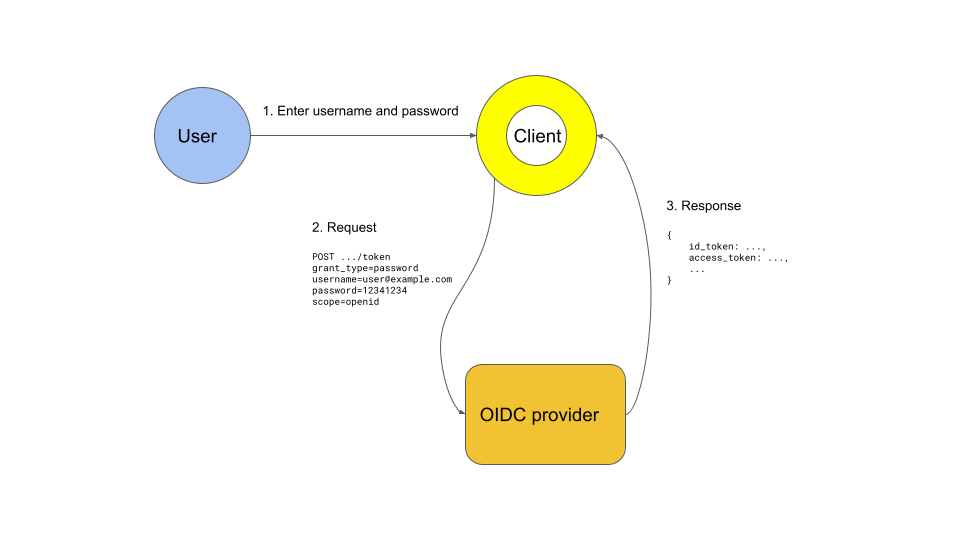
Password Grant Flow
This flow is generally not recommended as it requires a user’s credentials to be exposed to a client application. Users may be tempted to store their username and password in an unencrypted file for convenience, and these credentials are at risk of being leaked through logging or because they are held unencrypted in the client.
This is a simple request-response flow:
The user provides their username and password to the client
The client sends a request to the OIDC provider with the user’s credentials
The OIDC provider responds with a long-lived token that can be used for future requests
The request can optionally use client credentials for an added layer of security.
For this example, we will assume that the password grant flow is supported and
that the OIDC client is confidential.
In Keycloak, this can be done by setting Direct Access Grants Enabled and
ensuring the client’s Access Type is confidential through the client dashboard
in the admin UI.
Client configuration - Admin UI

We can use plain cURL to obtain a token, by emulating OpenID’s password
flow.
If we assume a set up where Keycloak is configured as an OIDC provider and that
there is an OpenID client named sd-api, we could obtain an authorization
token to access the API using plain cURL as:
export SD_USER="data-scientist-1@example.com"
export SD_PASSWORD="12341234"
export CLIENT_ID="sd-api"
export CLIENT_SECRET="sd-api-secret"

export KEYCLOAK_HOST="https://ml.example.com"
export KEYCLOAK_REALM="deploy-realm"

export _token_endpoint="$KEYCLOAK_HOST/auth/realms/$KEYCLOAK_REALM/protocol/openid-connect/token"
export RESULT=$( curl -s -X POST "${_token_endpoint}" \
  --data "username=${SD_USER}" \
  --data "password=${SD_PASSWORD}" \
  --data "client_id=${CLIENT_ID}" \
  --data "client_secret=${CLIENT_SECRET}" \
  --data "grant_type=password" \
  --data "scope=openid"
)
export TOKEN=$( echo $RESULT | sed -E 's/.*id_token":"([^"]+)".*/\1/g' )

echo "TOKEN=$TOKEN"
:selected:
The Python SDK supports the password-grant flow with password_grant
as the authentication method.
from seldon_deploy_sdk import Configuration
from seldon_deploy_sdk.auth import OIDCAuthenticator

config = Configuration()
config.auth_method = "password_grant"
config.host = "https://ml.example.com/seldon-deploy/api/v1alpha1"
config.oidc_server = "https://ml.example.com/auth/realms/deploy-realm"
config.oidc_client_id = "sd-api"
config.oidc_client_secret = "sd-api-secret"
config.username = "data-scientist-1@example.com"
config.password = "12341234"

# Authenticate against an OIDC provider
auth = OIDCAuthenticator(config)
id_token = auth.authenticate()

# Configure the obtained ID token as the one to use downstream
config.id_token = id_token
print(config.id_token)
Session Authentication
This approach does not require explicitly configuring an endpoint for the authentication provider. Requests to Seldon Enterprise Platform are intercepted at the ingress to the cluster and authenticated using cookies.
This is a simple request-response flow:
The user provides their username and password to the client
The client sends a request to Seldon Enterprise Platform which is intercepted and redirected to the auth provider
The client sends a request to this auth provider with the user’s credentials
The auth provider responds with a long-lived cookie that can be used for future requests
For this example, we will assume the use of Dex as the identity provider. This is the auth mechanism for kubeflow.
Warning
This example will fail if more than one authentication backend is configured in Dex.
:selected:
from seldon_deploy_sdk import Configuration
from seldon_deploy_sdk.auth import SessionAuthenticator

config = Configuration()
config.auth_method = "password_grant"
config.host = "https://ml.example.com/seldon-deploy/api/v1alpha1"
config.username = "data-scientist-1@example.com"
config.password = "12341234"

# Authenticate against an auth provider
auth = SessionAuthenticator(config)
id_token = auth.authenticate()

# Configure the obtained ID cookie as the one to use downstream
config.id_token = id_token
print(config.id_token)
Versioning
The API endpoints are versioned to avoid clashes between different versions of
the API.
The current version of the API is v1alpha1, which means that breaking changes
are still highly likely to happen.
Once the current version graduates to stable, it will be renamed to v1.
Note that this versioning schema is similar to the one followed in Kubernetes.